کیمرہ اینگلز کے نام ماسٹر کریں: سوشل ویڈیو کو بلند کرنے والے 10 شاٹس
اپنے مواد کو تبدیل کرنے والے کیمرہ اینگلز کے نام دریافت کریں۔ ہمارا رہنما سوشل میڈیا، اشتہارات اور مزید کے لیے 10 ضروری شاٹس کو پرو ٹپس سمیت بیان کرتا ہے۔
کیا آپ نے کبھی سوچا ہے کہ کچھ ویڈیوز دوسروں سے زیادہ طاقتور، پروفیشنل یا دلچسپ کیوں لگتی ہیں؟ راز ہمیشہ مہنگے آلات میں نہیں؛ یہ کیمرہ اینگلز کا حکمت عملی سے استعمال ہے۔ ہر شاٹ کا نفسیاتی اثر ہوتا ہے، جو ناظرین کی تاثر کو subtly shape کرتا ہے کہ وہ سبجیکٹ اور کہانی کو کیسے دیکھتے ہیں۔ کیمرہ اینگلز کے نام اور ان کی مخصوص افعال کو سمجھنا آپ کے کنٹینٹ کو آماتور سے ایکسپرٹ سطح تک لے جانے کا سب سے تیز طریقہ ہے۔ لامتناہی scrolling کی دنیا میں، اس بصری زبان کو master کرنے سے آپ thumbs روک سکتے ہیں، جذبات پہنچا سکتے ہیں، اور عمل کی ترغیب دے سکتے ہیں۔ کاروباروں کے لیے جو ترقی کو زیادہ سے زیادہ کرنا چاہتے ہیں، پروفیشنل ویڈیو کے ذریعے powerful visual storytelling کا استعمال ناظرین کو مؤثر طریقے سے جوڑنے کے لیے انتہائی اہم ہے۔
یہ گائیڈ 10 بنیادی کیمرہ اینگلز کو توڑتی ہے، واضح تعریفیں فراہم کرتی ہے اور، اس سے بھی اہم، سوشل میڈیا کنٹینٹ، اشتہارات اور برانڈ ویڈیوز میں ان کے استعمال کے لیے عملی ٹپس دیتی ہے۔ ہم نظریے سے آگے بڑھیں گے اور TikTok، Instagram Reels، اور YouTube Shorts کے لیے عملی منظرنامے دیں گے، تاکہ آپ آج ہی زیادہ متحرک اور مؤثر کنٹینٹ بنانا شروع کر سکیں۔ اپنی کامیابی کو frame کریں۔
1. Eye Level Shot
Eye level shot تمام کیمرہ اینگلز میں سب سے بنیادی اور relatable ہے۔ لینز کو سبجیکٹ کی آنکھوں کی هم ارتفاع پر رکھ کر، آپ ناظر کے ساتھ براہ راست اور neutral رابطہ قائم کرتے ہیں۔ یہ زاویہ حقیقی زندگی میں لوگوں سے بات چیت کی نقل کرتا ہے، برابری اور صداقت کا احساس پیدا کرتا ہے۔ کیونکہ یہ اتنا natural لگتا ہے، یہ اعتماد بنانے اور معلومات واضح طور پر پہنچانے کے لیے go-to ہے۔
TikTok influencer کا ذاتی کہانی فون میں براہ راست شیئر کرنا یا CEO کا LinkedIn ویڈیو کے لیے پروفیشنل testimonial دینا تصور کریں۔ Eye level shot ناظرین کو one-on-one conversation کا حصہ بناتا ہے، کسی بھی intimidation یا inferiority کا احساس ہٹا دیتا ہے۔ یہی وجہ ہے کہ یہ vloggers اور educators کے لیے personal brand بنانے کی بنیاد ہے۔
Eye Level Shot استعمال کرنے کے Creative Tips
یہ "default" زاویہ ہے، لیکن آپ اسے dynamic بنا سکتے ہیں۔ اسے subtle کیمرہ موومنٹ جیسے slow push-in کے ساتھ ملا کر، key message کے دوران emotional impact بڑھا سکتے ہیں۔ متبادل طور پر، edit میں foundational shot کے طور پر استعمال کریں، dramatic اینگلز (جیسے high یا low angle) پر کاٹنے سے پہلے eye level پر واپس آکر ناظر کو ground کریں۔
Pro Tip: Eye level shot کو core message کے A/B testing کے لیے استعمال کریں۔ کیونکہ زاویہ خود neutral ہے، آپ script، delivery، اور background visuals کی کارکردگی کو stylized angle کے نفسیاتی اثر کے بغیر واضح طور پر پڑھ سکتے ہیں۔
اس زاویے کا استعمال کب کریں:
- Tutorials & How-To Content: expertise قائم کرنے اور ناظرین کو عمل کے ذریعے واضح، دوستانہ طریقے سے گائیڈ کرنے کے لیے perfect۔
- Vlogs & Personal Updates: ناظرین سے strong، ذاتی رابطہ بناتا ہے۔
- Brand Testimonials: customer یا employee کی کہانیوں میں authenticity اور trustworthiness کا layer شامل کرتا ہے۔
- Interview Setups: interviewer، subject، اور audience کے درمیان balanced، conversational feel پیدا کرنے کا standard۔
2. Low Angle Shot
Low angle shot perspective تبدیل کرنے کا طاقتور ٹول ہے اور کیمرہ اینگلز کے نام سیکھنے کی key technique ہے۔ کیمرہ کو سبجیکٹ کی آنکھوں سے نیچے رکھ کر اوپر کی طرف aiming کر کے، آپ انہیں فوری طور پر dominant، powerful، اور significant بنا دیتے ہیں۔ یہ زاویہ ناظر کے ذہن میں سبجیکٹ کو psychologically elevate کرتا ہے، انہیں larger than life دکھاتا ہے۔ یہ authority یا heroism قائم کرنے کی classic cinematic technique ہے۔
TikTok ویڈیو میں "final boss" outfit دکھانا یا motivational speaker کو stage کے کنارے سے فلم کرنا تصور کریں۔ Low angle shot سبجیکٹ کو imposing اور aspirational بناتا ہے۔ direct-to-consumer brands کے لیے، یہ product reveal کے لیے perfect ہے، ordinary item کو premium اور monumental feel کراتا ہے۔ یہ standard eye-level view توڑ کر attention grab کرتا ہے، ناظرین کو signal دیتا ہے کہ جو وہ دیکھ رہے ہیں وہ important ہے۔
Low Angle Shot استعمال کرنے کے Creative Tips
Impact maximize کرنے کے لیے، low angle shot کو slow-motion کے ساتھ ملا کر heroic "hero moment" بنائیں، خاص طور پر action یا sports content کے لیے۔ lighting کا خیال رکھیں؛ key light کو chin اور nose کے نیچے unflattering shadows سے بچانے کے لیے position کریں۔ یہ ہر scene کے لیے نہیں، اس لیے strategically key moments پر استعمال کریں نہ کہ default کے طور پر، جو overuse سے overly dramatic لگ سکتا ہے۔
Pro Tip: Brand کو premium یا authoritative position کرنے کے لیے low angle استعمال کریں۔ New product launch کے لیے، slow، upward-tilting low angle shot anticipation build کر سکتا ہے اور item کو must-have، high-value solution پیش کر سکتا ہے۔
اس زاویے کا استعمال کب کریں:
- Product Reveals: New product کو impressive، valuable، اور highly desirable دکھاتا ہے۔
- Motivational Content: Speaker کو empower کرتا ہے اور message کو زیادہ impactful اور inspiring بناتا ہے۔
- Action & Sports Highlights: Athletes کی skill اور power کو peak performance کے دوران accentuate کرتا ہے۔
- Transformation Videos: Final "after" look کو confidence اور authority کے ساتھ دکھاتا ہے۔
3. High Angle Shot
High angle shot narrative کا طاقتور ٹول ہے جہاں کیمرہ سبجیکٹ کے اوپر position کیا جاتا ہے، نیچے کی طرف دیکھتا ہے۔ یہ perspective سبجیکٹ کو psychologically diminish کرتا ہے، انہیں vulnerable، weak، یا small دکھاتا ہے۔ ناظر کو dominant position دے کر، یہ power imbalance قائم کر سکتا ہے، helplessness کا احساس convey کر سکتا ہے، یا environment کا broader view دے سکتا ہے۔ یہ مختلف کیمرہ اینگلز کے ناموں میں audience کی emotional response shape کرنے کی key technique ہے۔
اسے problem-solution advertising میں استعمال کریں، جہاں high angle shot "before" state frame کرتا ہے، کسی کو struggling یا overwhelmed دکھاتا ہے۔ Documentary-style storytelling میں، یہ personal confession کے دوران subject کی vulnerability پر زور دیتا ہے۔ یہ recipe videos اور flat-lay product displays جیسے top-down content کی foundation بھی ہے، emotion سے clear، objective information کی طرف focus shift کرتا ہے۔
High Angle Shot استعمال کرنے کے Creative Tips
اس زاویے کو زیادہ impactful بنانے کے لیے، music کے ساتھ pair کریں جو intended emotion reinforce کرے، چاہے sadness، confusion، یا lifestyle shot میں tranquility ہو۔ Powerful narrative device ہے high angle (problem دکھانے) سے eye level یا low angle shot (solution کے بعد empowerment) کی طرف transition۔ یہ visual journey story کی resolution کو earned اور satisfying بناتی ہے۔
Pro Tip: Product-focused content کے لیے، high angle shot، خاص طور پر flat-lay، emotional distractions ہٹاتا ہے اور product کو hero بناتا ہے۔ Instagram یا Pinterest posts کے لیے perfect جہاں aesthetic clarity scroll روکنے اور interest drive کرنے کی key ہے۔
اس زاویے کا استعمال کب کریں:
- Problem-Solution Narratives: "Problem" phase دکھانے کے لیے ideal، character کی struggle کو solution سے پہلے highlight کرتا ہے۔
- Transformation Content: "Before" shot کے لیے استعمال کریں change کی ضرورت کو visually underscore کرنے کے لیے۔
- Vulnerable Storytelling: Creator کی difficult یا personal experience شیئر کرنے پر emotional weight شامل کرتا ہے۔
- Product & Food Content: Overhead flat-lays اور recipe tutorials کے لیے go-to، clean، comprehensive view دیتا ہے۔
4. Dutch Angle (Canted/Tilted Shot)
Dutch angle، جسے canted یا tilted shot بھی کہتے ہیں، filmmaker کی toolkit میں زیادہ expressive کیمرہ اینگلز کے ناموں میں سے ایک ہے۔ یہ کیمرہ کو tilt کرتا ہے تاکہ horizon line level نہ رہے بلکہ diagonal ہو۔ یہ فوری طور پر ناظر کے balance کو off کر دیتا ہے، disorientation، tension، unease، یا context کے مطابق excitement اور energy کے powerful feelings پیدا کرتا ہے۔ اس کی unnatural composition deliberate choice ہے کہ کچھ غلط یا highly dynamic ہے۔
یہ thrillers اور action movies میں suspense build کرنے کا staple ہے، لیکن high-energy social media content میں نئی جگہ پا لی ہے۔ Dynamic fitness instructor کا TikTok میں intense workout یا music video میں powerful chorus کے دوران tilted shot تصور کریں۔ Dutch angle visual norm disrupt کر کے attention grab کرتا ہے، Reels اور TikTok پر scroll-stopping content کے لیے powerful ٹول ہے۔
Dutch Angle استعمال کرنے کے Creative Tips
یہ زاویہ intention سے استعمال کریں، default نہیں۔ Slight tilt (تقریباً 15 ڈگری) dramatic scene میں subtle psychological tension introduce کر سکتا ہے، جبکہ aggressive tilt (30-45 ڈگری) chaotic action sequences کے لیے perfect ہے۔ Fast cuts اور energetic music کے ساتھ combine کریں effect amplify کرنے کے لیے، یا دو stable، eye-level shots کے درمیان disorienting transition کے طور پر استعمال کریں۔
Pro Tip: Product videos میں، launch announcement یا "big reveal" کے دوران quick Dutch angle استعمال کریں excitement اور urgency inject کرنے کے لیے۔ Sudden visual shift product کو زیادہ dynamic اور impactful feel کراتی ہے۔
اس زاویے کا استعمال کب کریں:
- High-Energy Content: Fitness، dance، یا sports videos کے لیے perfect، on-screen action سے match کرتا ہے۔
- Thrillers & Suspenseful Scenes: فوری unease کا احساس پیدا کرتا ہے اور signal دیتا ہے کہ کچھ غلط ہے۔
- Music Videos: Song کے rhythm اور mood کے ساتھ stylistic، energetic flair شامل کرتا ہے۔
- Scroll-Stopping Hooks: Reel یا TikTok کے پہلے 1-2 سیکنڈز میں tilted shot استعمال کریں تاکہ ناظرین pause کریں اور سوچیں کہ کیا ہو رہا ہے۔
5. Over-the-Shoulder Shot
Over-the-shoulder shot dynamic conversations بنانے اور subjects کے درمیان relationships قائم کرنے کا staple ہے۔ ایک شخص کے پیچھے کیمرہ position کر کے دوسرے کو فلم کر کے، آپ ناظر کو scene میں براہ راست رکھتے ہیں۔ یہ زاویہ ایک subject کے سر کے پیچھے اور کندھے کو foreground میں دکھاتا ہے، natural frame بناتا ہے جو interaction کو depth اور context دیتا ہے۔ یہ audience کا point of view guide کرنے اور dialogue میں participant feel کرانے کا مؤثر طریقہ ہے۔
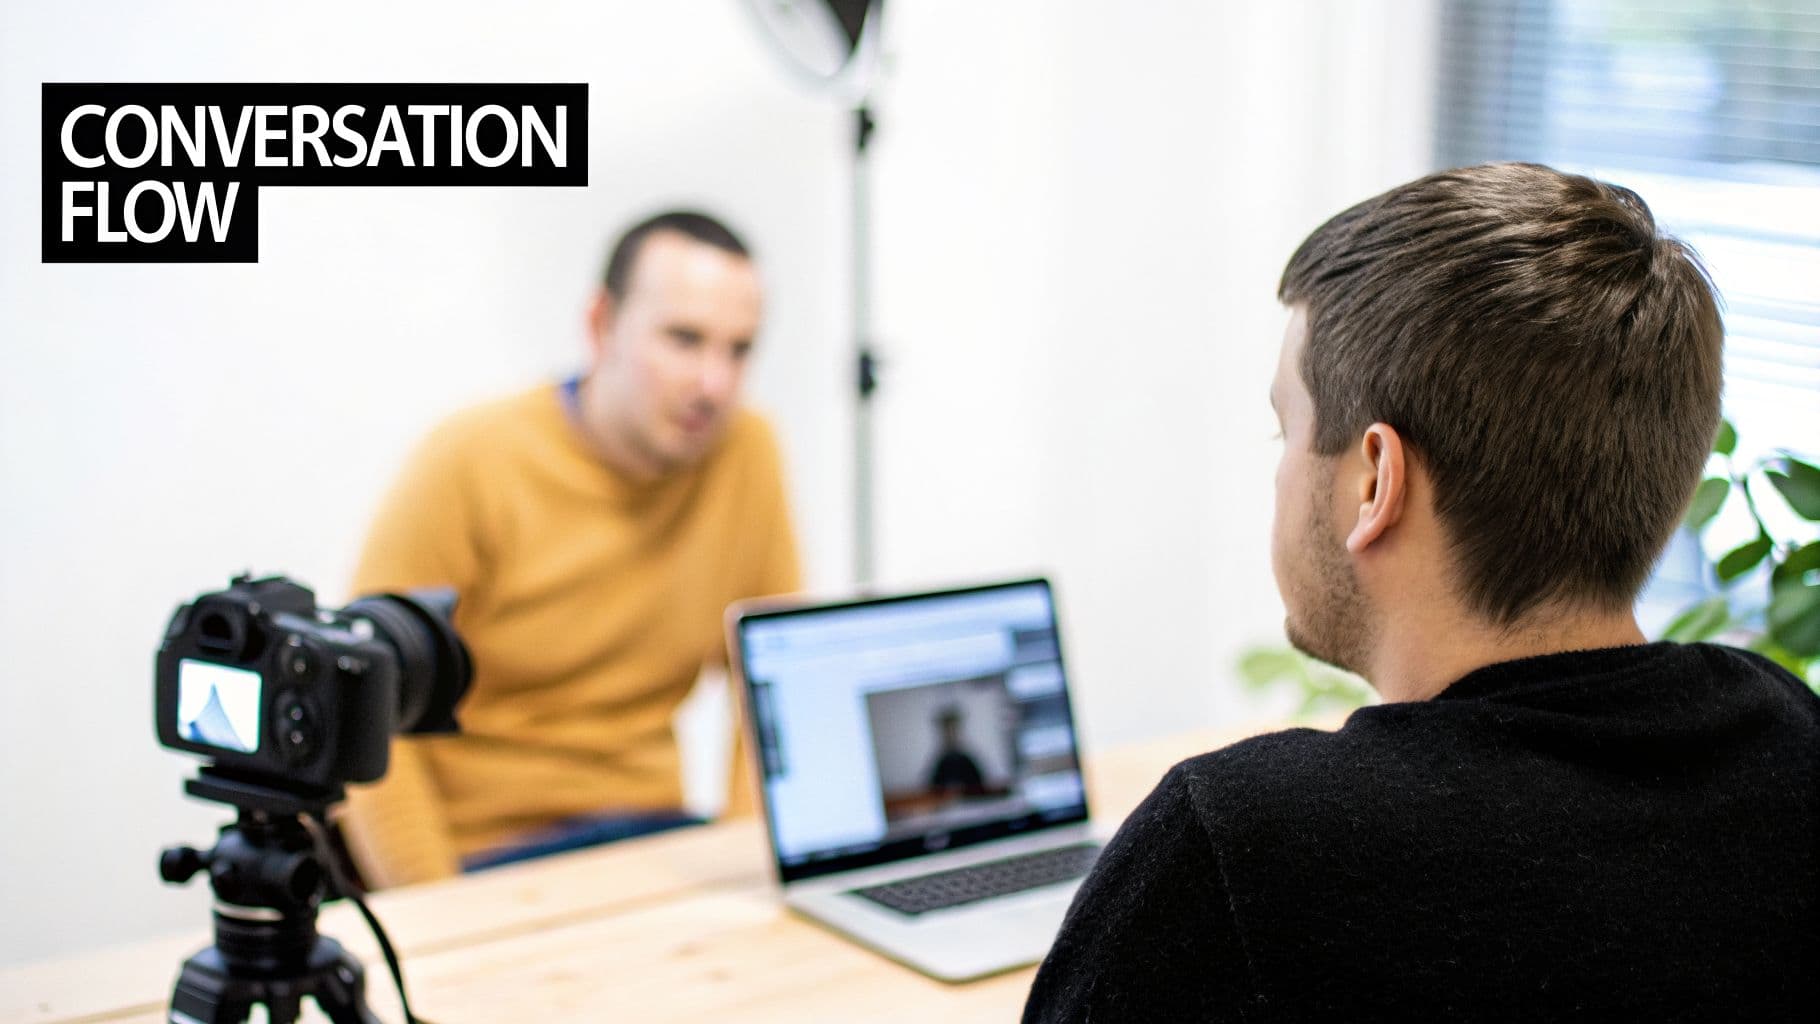
یہ interview-style content کی cornerstone ہے، professional podcasts سے customer testimonial videos تک۔ جب دو لوگ product کی features پر debate کر رہے ہوں یا coach client کو guide کر رہا ہو، over-the-shoulder perspective ناظر کو exchange میں immerse کرتا ہے۔ یہ مختلف کیمرہ اینگلز کے ناموں میں multi-person content کو connected اور coherent بنانے کا simple yet powerful ٹول ہے۔
Over-the-Shoulder Shot استعمال کرنے کے Creative Tips
Balanced conversation بنانے کے لیے، دونوں subjects کو ان کے اپنے over-the-shoulder shots سے فلم کریں اور ان کے درمیان کاٹيں۔ اسے shot/reverse shot کہتے ہیں۔ Foreground میں subject کو slightly out of focus رکھیں تاکہ ناظر کی نظر speaking person پر جائے۔ Reaction videos کے لیے، یہ angle content اور creator کی real-time response کو single، engaging frame میں دکھانے کے لیے perfect ہے۔
Pro Tip: Interview کے دوران، دونوں over-the-shoulder angles سے entire conversation capture کریں بغیر روکے۔ یہ edit میں complete coverage دیتا ہے، main speaker سے کاٹ کر interviewer کی listening reactions دکھا سکتے ہیں، جو authenticity اور engagement کا layer شامل کرتا ہے۔
اس زاویے کا استعمال کب کریں:
- Interview & Podcast Content: Professional، conversational flow قائم کرتا ہے اور dialogue edit آسان بناتا ہے۔
- Product Comparison Videos: دو لوگوں کو مختلف items کے pros اور cons پر debate دکھانے کے لیے perfect۔
- Coaching & Mentorship Content: ناظر کو student کی perspective میں رکھتا ہے، advice کو زیادہ personal feel کراتا ہے۔
- Reaction & Unboxing Videos: Product اور creator کی genuine reactions کو ایک cohesive shot میں capture کرتا ہے۔
6. POV Shot (Point of View)
POV (Point of View) shot سب سے immersive کیمرہ اینگلز کے ناموں میں سے ایک ہے، ناظر کو character یا subject کی perspective میں براہ راست رکھتا ہے۔ یہ دنیا کو بالکل ویسے دکھاتا ہے جیسے وہ دیکھتے ہیں، audience کو passive observer کی بجائے active participant بناتا ہے۔ یہ powerful presence اور personal experience کا احساس پیدا کرتا ہے، فوری رابطہ قائم کرتا ہے: "ان کی جگہ ہونے کا کیا مطلب ہے؟"
یہ social media میں dominant ہے، first-person product unboxing videos سے جہاں آپ خود package کھول رہے ہوں، viral TikToks simulating date تک۔ POV shot ناظر کو driver’s seat میں بٹھاتا ہے، content کو performance کی بجائے personal memory جیسا feel کراتا ہے۔ یہ high engagement اور relatability generate کرنے والے creators کے لیے fundamental ٹول ہے۔
POV Shot استعمال کرنے کے Creative Tips
POV shot کو authentic بنانے کے لیے، smooth، natural کیمرہ موومنٹ پر focus کریں۔ Jerky motions avoid کریں جب تک chaotic scene intentionally نہ دکھا رہے ہوں، جیسے running یا sports activity۔ Visual کو strong sound design جیسے breathing یا footsteps کے ساتھ pair کریں immersion deepen کرنے کے لیے۔ Tutorials کے لیے، یہ student کو action perform کرنے والا feel کراتا ہے۔
Pro Tip: Product demonstrate کرتے ہوئے، POV shot ناظر کو mentally rehearse کرنے دیتا ہے۔ وہ اپنے ہاتھوں (یا ایسا feel) کو item سے interact کرتے دیکھتے ہیں، جو purchase desire کو significantly influence کرتا ہے۔ یہ "try before you buy" mindset کا direct line ہے۔
اس زاویے کا استعمال کب کریں:
- Product Demonstrations: ناظر کو product کو firsthand experience، unboxing سے usage تک دیتا ہے۔
- Tutorials & How-To Content: Learner کو action میں براہ راست رکھتا ہے، recipe یا software guide follow کرتے ہوئے۔
- Immersive Storytelling: Short narratives میں suspense، empathy، یا excitement پیدا کرنے کے لیے perfect۔
- Gaming & Sports Content: Gameplay یا action کو player کی perspective سے دکھانے کا standard۔
- Social Media Trends: "Get ready with me" (GRWM)، day-in-the-life، یا interactive skits کے لیے ideal۔
7. Wide/Establishing Shot
Wide shot، اکثر establishing shot کہلاتا ہے، ناظرین کو فوری context دینے والا زاویہ ہے۔ یہ entire scene یا location کا broad view capture کرتا ہے، action شروع ہونے سے پہلے "کہاں؟" اور "کب؟" کے بنیادی سوالات کے جواب دیتا ہے۔ یہ powerful ٹول story کا tone، mood، اور scale پہلے frame سے set کرتا ہے، cinematic storytelling کی cornerstone اور content creator کی visual vocabulary کا key حصہ ہے۔
Travel vlog کا sweeping drone shot coastline کا یا real estate video کا property کا full view sunset پر شروع ہونا تصور کریں۔ یہ shots صرف جگہ نہیں دکھاتے؛ feeling اور promise sell کرتے ہیں۔ ناظر کو orient کر کے، following closer، detailed shots کو grounded اور meaningful بناتے ہیں۔ یہ subject کے ارد گرد world بنانے والے creators کے لیے crucial کیمرہ اینگلز کا نام ہے۔
Wide/Establishing Shot استعمال کرنے کے Creative Tips
اس کا primary کام context دینا ہے، لیکن engaging بنانے کے لیے slow، subtle movement جیسے landscape پر pan یا building کی طرف gentle push-in شامل کریں viewer interest maintain اور professional feel کریں۔ یہ impressive environments showcase یا entire workspace/studio reveal کر کے credibility establish کرنے کے لیے perfect ہے۔
Pro Tip: Establishing shot کو overstay نہ ہونے دیں۔ Scene set کرنے کے لیے 3-5 سیکنڈ استعمال کریں، پھر medium یا close-up پر کاٹيں subject سے connect کرنے کے لیے۔ Wide shot hook کرتا ہے، closer shots invested رکھتے ہیں۔
اس زاویے کا استعمال کب کریں:
- Travel & Vlog Content: New destination showcase اور adventure کا احساس پیدا کرنے کے لیے opening sequences میں essential۔
- Real Estate & Property Tours: Home یا commercial space کا scale، setting، اور curb appeal فوری قائم کرتا ہے۔
- Office & Workspace Videos: Team environment دکھا کر brand transparency اور credibility build کرتا ہے۔
- Event Coverage: Conference، concert، یا gathering کی energy اور scale capture کرتا ہے specific moments میں جانے سے پہلے۔
8. Close-Up Shot
Close-up shot intimacy پیدا کرنے اور detail پر زور دینے کا طاقتور ٹول ہے، subject یا object کو tightly frame کر کے۔ کیمرہ اینگلز کے ناموں کی اس classic entry میں screen بھر جاتا ہے، ناظر کی توجہ specific element پر force کرتا ہے، چاہے person کے چہرے پر raw emotion ہو یا product کی intricate texture۔ یہ distractions eliminate کرتا ہے اور direct، focused connection بناتا ہے۔
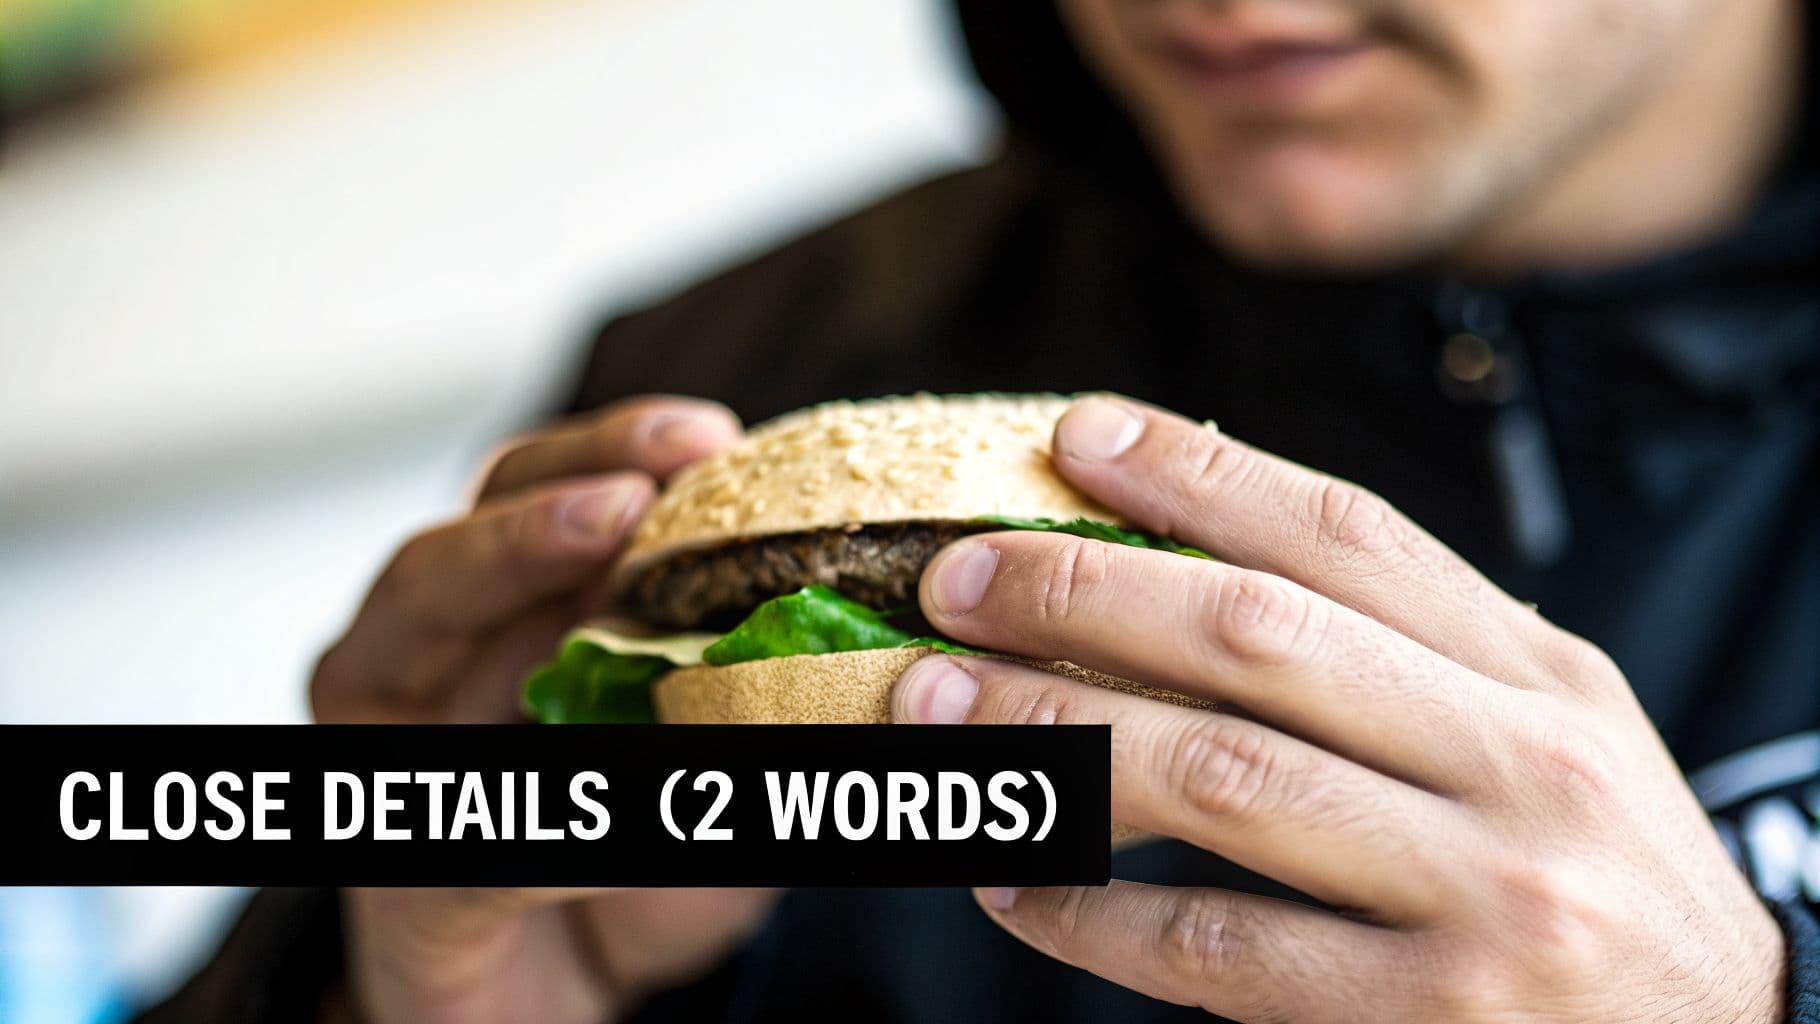
Beauty influencer کا new foundation کی smooth application showcase یا food vlogger کا burger کی juicy details capture تصور کریں۔ Close-up shot emotional storytelling میں subtle facial expressions convey کرنے کے لیے essential ہے اور e-commerce ads کے لیے non-negotiable جہاں product quality highlight کرنی ہو۔ یہ زاویہ ناظرین کو subject feel، see، اور تقریباً touch کرنے دیتا ہے۔
Close-Up Shot استعمال کرنے کے Creative Tips
Close-ups کو compelling بنانے کے لیے، subtle movements pair کریں۔ Product کی surface پر slight pan texture reveal کر سکتا ہے، جبکہ person کی آنکھوں میں slow zoom suspense build کر سکتا ہے۔ Social media کے لیے، montage میں multiple close-ups کے quick cuts transformation کی details یا item کی مختلف features effectively دکھا سکتے ہیں۔ Polished visuals کے لیے، AI-powered image editor سے product shots اور دیگر imagery perfect کریں۔
Pro Tip: Close-up shot importance signal کرنے کے لیے استعمال کریں۔ Wider shot سے object یا facial reaction پر close-up کاٹنے سے، آپ visually بتاتے ہیں، "توجہ دیں، یہ matter کرتا ہے۔" یہ classic cinematic technique ہے جو short-form content میں wonders کرتی ہے۔
اس زاویے کا استعمال کب کریں:
- Product Demonstrations: Item کی quality، texture، color، اور key features دکھانے کے لیے essential۔
- Emotional Storytelling: Joy، sadness، یا surprise جیسے feelings convey کرنے کے لیے subtle facial expressions capture کرتا ہے۔
- Food & Recipe Videos: Textures اور ingredients پر focus کر کے food کو appealing بناتا ہے۔
- Beauty & Skincare Content: Skin پر product application اور results دکھانے کے لیے perfect۔
- Lip-Sync & Reaction Videos: Mouth یا eyes پر focus کر کے expressive impact maximize کرتا ہے۔
9. Bird's Eye View Shot (Overhead)
Bird's eye view shot، جسے overhead shot بھی کہتے ہیں، کیمرہ کو scene کے بالکل اوپر position کرتا ہے، سیدھا نیچے دیکھتا ہے۔ یہ unique، map-like perspective بناتا ہے جو ناظر کو emotionally detach کرتا ہے اور pattern، organization، اور objects کے درمیان relationship پر زور دیتا ہے۔ یہ god-like view دیتا ہے، setup کا full scope reveal کرتا ہے اور visual storytelling اور aesthetic compositions کے لیے powerful ٹول ہے۔

Food bloggers اور lifestyle creators نے اسے popular کیا، everyday scenes کو art work میں بدل دیتا ہے۔ "What's in my bag?" Reel میں products neatly arranged یا desk organize ہونے کا satisfying time-lapse تصور کریں۔ Overhead perspective tutorials کے لیے excellent ہے جہاں tools کی arrangement key ہو، جیسے makeup application یا recipe videos، non-obstructed viewpoint سے ہر step واضح دکھاتا ہے۔
Bird's Eye View Shot استعمال کرنے کے Creative Tips
Overhead shots کو engaging بنانے کے لیے motion introduce کریں۔ Time-lapse سے process unfolding دکھائیں، جیسے meal prepare ہونا یا painting بننا۔ Product content کے لیے، stop-motion animation سے items خود move ہوتے لگیں، whimsical اور captivating quality شامل کرے۔
Pro Tip: Flat-lays shoot کرتے ہوئے lighting پر close attention دیں۔ Single، harsh overhead light unflattering shadows بنا سکتی ہے۔ Large، soft light source (جیسے softbox یا diffused light والا کھڑکی) کو slightly side پر رکھیں gentle، even lighting کے لیے جو products کی textures اور details highlight کرے۔
اس زاویے کا استعمال کب کریں:
- Flat-Lay Product Photography: Instagram یا Pinterest کے لیے multiple products کو styled، aesthetically pleasing arrangement میں showcase کرنے کے لیے ideal۔
- Food & Recipe Content: Ingredients اور cooking process کا clear، top-down view دیتا ہے، ناظرین کو follow along آسان بناتا ہے۔
- Workspace & Desk Setup Tours: Creator کی setup کا full overview دیتا ہے، organization اور gear highlight کرتا ہے۔
- Before-and-After Transformations: Organization یا cleaning project کا impact ایک single، powerful frame میں دکھانے کے لیے perfect۔
10. Two-Shot
Two-shot foundational کیمرہ اینگل ہے جو دو subjects کو same shot میں frame کرتا ہے، فوری ان کے درمیان relationship قائم کرتا ہے۔ یہ context، interaction، اور connection کے بارے میں ہے۔ دو لوگوں کو side-by-side رکھ کر، یہ ان کی story بتاتا ہے، چاہے partnership، conflict، comparison، یا collaboration کی ہو۔ یہ interviews، podcast recordings، اور dialogue key والے content کی visual backbone ہے۔
Favorite YouTube collaboration video یا TikTok trend میں couple تصور کریں۔ Two-shot authentic back-and-forth، subtle reactions، اور shared energy capture کرتا ہے جو single shot miss کر دے۔ یہ ناظرین کو genuine interaction observe کرنے دیتا ہے، interviews میں credibility build یا relationship-focused content میں chemistry دکھانے کے لیے perfect۔
Two-Shot استعمال کرنے کے Creative Tips
Two-shot کو engaging بنانے کے لیے، subjects کو ایک دوسرے اور کیمرہ کی طرف slight angle پر position کریں، straight on کی بجائے۔ یہ natural، conversational posture بناتا ہے۔ Composition سے story بتائیں؛ close together intimacy suggest کرتا ہے، space tension یا distance imply کرتا ہے۔
Pro Tip: Interview فلم کرتے ہوئے، single shots capture کرتے ہوئے بھی wide two-shot پر کیمرہ rolling رکھیں۔ یہ post-production میں listener کی reactions کا valuable B-roll دیتا ہے، conversation کو dynamic اور authentic بنانے کے لیے کاٹ سکتے ہیں۔
اس زاویے کا استعمال کب کریں:
- Interviews & Podcasts: Host اور guest کے درمیان dynamic دکھانے کے لیے essential۔
- Product Comparison Videos: دو items کو side-by-side visually رکھ کر direct debate یا feature analysis کے لیے۔
- Couple & Collaboration Content: دو creators کے درمیان shared experience اور chemistry capture کرتا ہے۔
- Coaching & Mentorship Calls: Teacher-student relationship frame کرتا ہے، guidance اور response دونوں دکھاتا ہے۔
10 کیمرہ اینگلز کا موازنہ
| Shot | Implementation 🔄 | Resources ⚡ | Expected Outcomes ⭐📊 | Ideal Use Cases 📊 | Key Advantages 💡 |
|---|---|---|---|---|---|
| Eye Level Shot | 🔄 کم — simple framing، minimal setup | ⚡ کم — ایک کیمرہ، tripod، basic lighting | ⭐ Natural، relatable؛ 📊 steady engagement اور trust | Interviews، tutorials، testimonials، vlogs | 💡 اعتماد بناتا ہے، highly versatile، easy baseline |
| Low Angle Shot | 🔄 درمیانہ — low positioning اور composition care درکار | ⚡ درمیانہ — low tripod/jib؛ mindful lighting | ⭐ Powerful، authoritative؛ 📊 high visual impact | Product hero shots، motivational اور action content | 💡 Dominance اور scale convey کرتا ہے strong presence کے ساتھ |
| High Angle Shot | 🔄 درمیانہ — elevated placement اور clearance درکار | ⚡ درمیانہ — ladder/boom یا rig، overhead lighting | ⭐ Vulnerability اور context دکھاتا ہے؛ 📊 environment clarify کرتا ہے | Before/after، vulnerability scenes، overhead tutorials | 💡 Scale/weakness پر زور دیتا ہے اور scene establish کرتا ہے |
| Dutch Angle (Canted) | 🔄 درمیانہ — tilt composition کو balance درکار | ⚡ کم — tripod پر simple tilt یا handheld | ⭐ Tension اور energy؛ 📊 attention quickly grab کرتا ہے | Thriller beats، high-energy Reels/TikToks، transitions | 💡 Drama اور dynamism پیدا کرتا ہے— sparingly استعمال کریں gimmick سے بچنے کے لیے |
| Over-the-Shoulder Shot | 🔄 درمیانہ — careful subject placement اور eye lines | ⚡ درمیانہ — extra space، lens choice، lighting both subjects | ⭐ Depth اور context شامل کرتا ہے؛ 📊 conversational clarity improve کرتا ہے | Interviews، debates، multi-person reviews، coaching | 💡 Eye lines اور interaction flow preserve کرتا ہے، static wide سے زیادہ engaging |
| POV Shot (Point of View) | 🔄 درمیانہ سے زیادہ — realistic movement اور framing درکار | ⚡ درمیانہ سے زیادہ — body rigs/stabilizers، smooth motion control | ⭐ Immersive اور engaging؛ 📊 strong viewer involvement | Product demos، first-person storytelling، tutorials، VR | 💡 Viewer کو protagonist کی جگہ رکھتا ہے— smooth ہونے پر very persuasive |
| Wide / Establishing Shot | 🔄 کم سے درمیانہ — framing اور location scouting درکار | ⚡ کم — wide lens، space؛ drone scale کے لیے | ⭐ Location اور scale set کرتا ہے؛ 📊 audience کو quickly orient کرتا ہے | Travel intros، real estate، scene transitions، event coverage | 💡 Context اور scale دیتا ہے؛ closer shots کے ساتھ emotion کے لیے pair کریں |
| Close-Up Shot | 🔄 کم — precise framing اور focus درکار | ⚡ درمیانہ — macro/tele lenses اور good lighting | ⭐ Emotion اور detail convey کرتا ہے؛ 📊 features کے لیے high engagement | Product detail، emotional beats، beauty اور food content | 💡 Texture اور expression highlight کرتا ہے— careful lighting درکار |
| Bird's Eye View (Overhead) | 🔄 درمیانہ سے زیادہ — overhead rigging یا drone درکار | ⚡ زیادہ — rig/drone، top lighting، careful arrangement | ⭐ Striking، organized compositions؛ 📊 clear spatial relationships | Flat-lays، food، workspace tours، satisfying arrangement videos | 💡 Unique، map-like perspective دیتا ہے pattern اور layout کے لیے |
| Two-Shot | 🔄 درمیانہ — دو subjects کے لیے balanced framing | ⚡ درمیانہ — lighting both subjects، adequate space | ⭐ Relationships اور reactions دکھاتا ہے؛ 📊 efficient conversational capture | Interviews، collaborations، product comparisons، pair content | 💡 Authentic interaction اور dynamics capture کرتا ہے constant cuts کے بغیر |
AI-Powered Video سے اپنے علم کو عمل میں بدلیں
آپ نے ابھی commanding Low Angle shot سے intimate Close-Up تک کیمرہ اینگلز کی full roster explore کی۔ کیمرہ اینگلز کے نام کو سمجھنا foundational step ہے، لیکن real power specific emotions evoke کرنے اور audience کی perception guide کرنے میں apply کرنے میں ہے۔ ہر angle آپ کی visual storytelling kit کا ٹول ہے، trust بنانے، suspense پیدا کرنے، authority قائم کرنے، یا viewer سے direct connection foster کرنے کے قابل۔
Core lesson یہ ہے کہ framing کبھی neutral نہیں۔ Eye-Level shot سے High Angle کی simple shift subject اور audience کے dynamic کو completely change کر سکتی ہے۔ Wide Shot context دیتا ہے، جبکہ POV shot ناظر کو action میں براہ راست ڈال دیتا ہے۔ ان techniques کو master کرنے کا مطلب ہے کہ آپ صرف content record نہیں کر رہے؛ purpose اور intention سے direct کر رہے ہیں۔
Theory سے Practical Application تک
Creators، marketers، اور brands کے لیے true challenge ideas کی کمی نہیں بلکہ انہیں effectively execute کرنے کے لیے time اور resources کی کمی ہے۔ Conversational ad کے لیے Two-Shot manually set کرنا، پھر dramatic Dutch Angle reveal کے لیے re-frame کرنا، اور آخر میں product کا Bird's-Eye-View capture کرنا پورا دن لے سکتا ہے۔ یہ production bottleneck اکثر creators کو single، static angle پر settle کرنے پر مجبور کر دیتا ہے، multiple shots کی dynamic energy sacrifice کر کے۔
یہاں آپ کا camera work کا نیا علم modern technology سے ملتا ہے۔ ہر angle کو separate، time-intensive setup کی بجائے descriptive commands سمجھیں۔ تصور کریں بس ویڈیو describe کرنا:
- "ایک شخص کو ڈیسک پر Wide Shot سے شروع کریں۔"
- "ان کی determined expression کا Close-Up پر کاٹیں۔"
- "کی بورڈ پر ٹائپ کرنے کا POV Shot دکھائیں۔"
- "ڈیسک پر finished product کا Low Angle Shot سے ختم کریں، heroic لگے۔"
یہ sequence complete story بتاتی ہے، context سے emotion اور powerful product reveal تک۔ Manually produce کرنا محنت ہے۔ Describe کرنا آسان ہے۔ AI-powered tools کے ساتھ، وہ description آپ کی vision کو life میں لانے کے لیے کافی ہے۔ کیمرہ اینگلز کے نام کے strategic knowledge کو AI کی efficiency کے ساتھ combine کر کے، آپ concept سے finished video تک minutes میں پہنچ سکتے ہیں، نہ hours۔ یہ approach content production scale کرنے، different visual approaches A/B test کرنے، اور professional polish والی videos consistently publish کرنے دیتا ہے جو audiences کو captivate کرتی اور meaningful engagement drive کرتی ہے۔
کیمرہ اینگلز کے علم کو manual effort کے بغیر practice کرنے کو تیار؟ ShortGenius (AI Video / AI Ad Generator) آپ کے simple text prompts لے کر فوری entire video ads اور content generate کرتا ہے، strategic camera angles، movements، اور voiceovers سمیت۔ Shots plan کرنا چھوڑیں اور seconds میں create کریں ShortGenius (AI Video / AI Ad Generator) پر۔